Search This Blog

Tuesday, December 20, 2022

Stocking for Sebastian


Finished

     I have done a couple of stockings this season.  The first one I had to take apart to do the stitching and I used a wash-away film topper to keep down the nap of the fur.  This client wanted blue to match the blue in the ornaments on the dog's antlers.

Under the hoop hooping

     I used my software to get the name and added a stitched box all around.  That would keep the layers of the stocking cuff together.  I then cut a window in some hooped stabilizer slightly larger than the box. I pinned the stocking underneath and then took it to the embroidery machine.

Stitching

     As you can see, the name looks upside down but that is based on how I hooped the stocking and placed it on the machine.  I did hold up the stocking during the stitching to make sure it didn't pull too much and loosen the stocking from the stabilizer.  


Wednesday, December 14, 2022

Christmas Jammies 2022


Embroidery detail

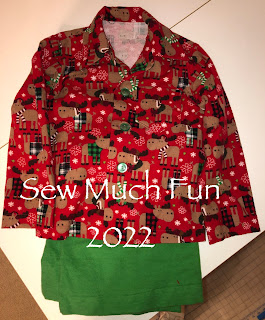
     Every year I make or embroider jammies for the grandkids.  This year I opted to sew them pajamas.  I had bought Christmas flannel last year at JoAnn Fabrics.  For the youngest I used Kwik Sew Sewing for Babies book.  I made a pair of flannel pants and a long sleeve t-shirt that I embroidered.  The design is from Designs by JuJu.

For GJB

     My goal is that these are from St Nick on the feast of Saint Nicholas on December 6.  I make sure their parents have them in time to give them on that day.  

For SEB

     When I was cutting everything out, I found I was short on fabric so I opted to make the only granddaughter's pajamas out of a different fabric.  I used various pajama patterns that I had in my stash.

For MTB

     It was fun playing around with the fabrics to make somewhat matching pajamas for them all.  I did have to do a bit of piecing to get the oldest one's top, adding a center back seam.

For Miss M

     I did have to buy some buttons for the boys' pajamas as I didn't have enough of the right sized ones in my stash.  

For Cltn

     On the pockets of the boys' pajamas I made sure to center one of the moose.  In the youngest one's embroidery, I used pieces of fabric from the other ones' pajamas to tie them all together.  

Pocket detail

     I don't know how much they still believe in Santa, but I did hear the middle grandchild told his mom that the pajamas smelled like grandma and grandpa Breen's house :-)

Wednesday, December 7, 2022

Another T-shirt Quilt


T-shirt quilt

     A neighbor wanted a t-shirt quilt for her son.  She let him choose the shirts.  She brought me a bag with twelve t-shirts.  Normally I would have made a 3 x 4 quilt from that number of t-shirts.   However two of the t-shirts had extra long designs and I didn't want to cut them if I didn't have to.  Several of the t-shirts also had good front and back designs so I opted to go with a 4 x 5 layout of t-shirts.

Final layout

      I first cut apart the t-shirts and played around with a layout.  Then I interfaced the backs of the t-shirt pieces with fusible interfacing and then cut out the squares with my 13" square ruler, except for the two long ones.  I then sewed the columns and then put them together.

Pinning to the backing

     I then laid the fleece out and placed the right side of the quilt top down and pinned all around.  I then trimmed the fleece and sewed around the edges with a 1/2" seam allowance, leaving an opening to turn. 


Pinning for stitching lines

      I turned it right side out and stitched close to the edge, closing the opening in the process.  Then, using straight pins, I pinned the intersections, making sure everything was nice and smooth.

Stitch in the ditch

     I then stitched in the ditch at all the intersections,  I did about 1 1/2" in all directions.  From the back it looks like small crosses.  This prevents the layers from shifting around too much.


Tuesday, November 29, 2022

Stocking for Selena


Christmas owls for Selena

     A few years ago my sister asked me to make a Christmas stocking for her new granddaughter, Tegan, and she wanted owls on it.  I found them at Designs by JuJu. This year my sister needed another stocking for her newest granddaughter, the little sister of Tegan.  She wanted them to be similar so I used the owl designs again but some different ones. 

Design placement

     I chose the designs I wanted to use and printed out full size templates of them  I then arranged them on the cut stocking pattern and used blue painters' tape to hold them in place.  I marked the crosshairs with pins and then placed the fabric on sticky paper in the hoop and stitched out the designs.  


Stitching out the first owl

     The pattern I used for the stocking is from Embroidery Library.  When I bought some Christmas stocking designs for my grandkids, this pattern was part of the pdf instructions.  


Adding the lining

     I line my Christmas stockings because I like how they look better.  After stitching right sides together of the outer pieces and the lining pieces, I place the lining inside the stocking, wrong sides together and baste around the top opening.  


Cuff all stitched

     I stitch the name onto the cuff fabric and then sew it into a tube and then sew it together with the stocking, making sure I add in the loop hanger.


Finished


Tuesday, November 22, 2022

Breensgiving 2022


     This past Sunday was our Thanksgiving.  We call it 'Breensgiving' as it is the Sunday our family gets together to celebrate the Thanksgiving holiday.  I used to make all the food but several years ago I decided to let the other family members help.  I send out an Evite a few weeks prior and provide a list of possible things to bring.  I do provide the meat course.  This year I made Crockpot Brown Sugar Balsamic Glazed Pork Tenderloin.  It was nice because I didn't need oven space for it.  I also made a turkey breast for those turkey lovers.

Table in the dining room

     I also needed to provide an appetizer and one side dish.  I made Baked Bacon Cheese Dip.  It was really yummy.  The recipe more than filled the bread I had so I used a small casserole dish to bake the extra.  Maybe if I make it again I would have two loaves of bread.  I prepped everything the night before so I just had to bake it before the guests arrived.

Appetizer

     After finding out my daughter was making mashed potatoes and my daughter-in-law was making honey glazed carrots, I chose to make Twice Baked Butternut Squash as the third side dish.  Again, another yummy recipe.  I did bake the squash the night before and make the filling.  I refilled the shells and then refrigerated everything overnight.  I pulled them out in the morning to warm up and then baked them the second time just before eating.

Squash
 
          I do set the table with china, silver and crystal.  It does mean a bunch of dish washing but everyone helps and it looks so pretty.  As usual there were a lot of leftovers, I sent everyone home with some so we don't have to eat them for weeks on end.

Pork tenderloin

     Have a wonderful Thanksgiving everyone.


Wednesday, November 16, 2022

Lavender Stepping Stones Quilt


Finished quilt

     I found this pretty lavender floral print at Mill House Quilts while on my way to quilt retreat in October 2021.  I bought the two coordinating prints so I could do a three yard quilt, adding an extra half yard for the binding.  This time I chose the Stepping Stones pattern.  This is a nice quick pattern that still looks great.

The two different blocks

Border

     I cut the fabric at home, pieced it at the March 2022 retreat and then added the borders at home.

Backing and quilting detail

     Found a great piece for the back in my stash from Joni.  I then took it all to her to quilt with a fun swirly pattern.  
Info label

Quilt name label

     I designed and stitched out my labels and put on the binding.  Now a have a pretty green and lavender quilt to use.  


Wednesday, November 9, 2022

Sweater Pillow

Sweater pillow


     A client brought me her mom's sweater and wanted it made into a pillow.  She wanted to preserve the pockets if possible.

Puckered front

     In evaluating the sweater, I found the grosgrain ribbon on the front edges had shrunk and/or the sweater stretched out.  The only way to get the fronts to lie flat was to snip the ribbon.  I couldn't remove it because the buttonholes were sewn through it.

Snipping the grosgrain ribbon

     Snipping the ribbon din't totally alleviate the problem so I used steam to block the sweater and 'shrink' it up some.  Then I ironed on a fusible backing to stabilize the pieces before cutting them to size.  I also stitched the front closed so it wouldn't gape between the buttons.

Blocked sweater front

    As it was quite a lightweight sweater I added a napped lining to give it more body.  I cut off the corners to prevent 'dog ears' and serged the lining to the stabilized sweater.  I did cut the front slightly off center to allow for one full pocket and the other was a partial pocket.

Pocket detail

     The back was just a full piece with fused stabilizer and lining.  I did hand sew it closed, no zipper.  I do think a nicer pillow form would have made a nicer pillow but I went with what I was given.

Back of the pillow


Wednesday, November 2, 2022

Star of the Week Backpack


Star of the week backpack

     Many years ago I made a special backpack for my daughter to use for her kindergarten students.  That backpack finally wore out and she needed a new one.  I couldn't find the pattern I had used before so I searched on Pinterest and found one.

Embroidery on the front

      I wanted to use sturdy fabric but didn't have any canvas fabric in my stash.  Instead I turned to old jeans.  I cut apart a couple of pairs to get the pieces I needed.  I then embroidered the front of the backpack.  For the lining I used some flannel I had in my stash.  

Using Wonder Clips

     The directions for the size of pieces needed weren't accurate but I figured out what I needed to cut.  I used Wonder Clips instead of pins because of the thickness of the fabric.  

Using a hump jumper

     Where the straps were inserted into the bag, it was very thick.  I used a hump jumper to level out the foot so it would sew properly plus I also used a large denim needle.

Inside

    I do like how there are no raw edges anywhere, nice and neat inside.  I hope this one lasts for years like the last one.

Top of the bag


Wednesday, October 26, 2022

Time for Trick or Treat


Halloween bucket

     Years ago I bought these fabric buckets, some were vinyl and some were cotton fabric.  I have been decorating the vinyl ones for the grandkids to use on Halloween.  Our youngest grandson was born last September and I didn't get around to making his bucket right away.

Putting it back together

     This year he is walking now and I figured he might be up for a bit of Trick or Treating so it was time to do his bucket.  I used the ghost appliqué from Designs by JuJu.  To make the embroidering easier I pretty much dismantled the bucket.  I did the appliqué on my six needle machine and then re-sewed it all together.

Inside, no stitching showing

     I like to do it this way because it hides the backside of the embroidery and the inside looks as nice as the outside.  'Sew' fun to sew for the grandkids :-)

Wednesday, October 19, 2022

Pillowcases for Gabriel


Birthday, New Year's Day, Valentines Day

     For the grandkids' first birthdays I make them a set of pillowcases, to celebrate special days.  Shortly after they are born, I start searching in my stash to see what I have.  Then I hit up different quilt stores to buy the rest of the fabrics.  This year I could not find anything for New Year's Day or Thanksgiving.  I went online to Spoonflower to get fabric printed.  The quality of the fabric and printing were good but I was very disappointed that it had very wide white margins that necessitated making a smaller pillowcase.  

Mardi Gras, St Patrick's Day, Easter

     After I get all the fabrics cut, I then spend time at the computer using my MasterWorks software to create the embroidery files with the name.  I usually use the same font or idea for the each holiday from grandchild to grandchild.  For the Mardi Gras pillowcase, I have used the Cajun font and for the Valentine pillowcase, I tried to match the font in the embroidery design.

Summer, Baseball, Fourth of July

     I then embroider the name on the end piece in the upper left hand quadrant, centering it within the seam allowances.  Then using the 'hotdog' method I stitch it all together.  I use a french seam for the final part so there are no raw edges anywhere.  

Back to School, Football & Halloween

     I have a lot of fun choosing the fabrics and putting these together.  I hope that these will be something they use for years to come.

Thanksgiving and Christmas
 
      For directions on how I made these see my blog here.